Hello Every One ,
This is Vivo Y19 mobile. The customer brought this mobile to our shop.The technician asked what was the problem. The customer said that the mobile was dead while another technician was unlocking it.The technician told the customer that the technician will check the mobile and repair it.

Now let's check this mobile :
- First open the mobile back panel.
- This mobile has already gone to another technician. While the technician was scratching the test points to unlock it, this mobile died.
- So he covered it with a UV mask. Later it came to us.
- First if we connect the 6 in 1 charger it takes 0.09 milliampere.
- If connected to the computer, it will take the mtk port.
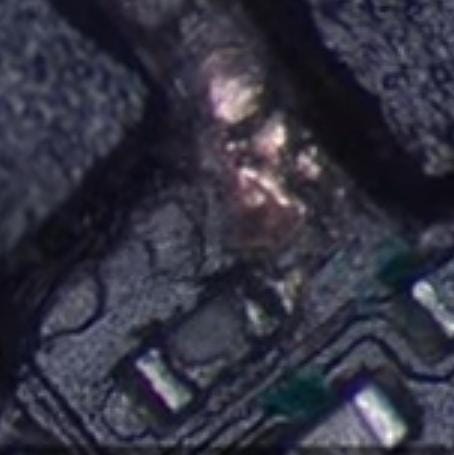
- The up mask applied by another technician should be cleaned.
- Check if the test point is damaged or if the print is lifted.
- Here the test point is in the middle of cpu and EMMC.
- That test point is covered with black paste. We have to clean that black paste.
If you want to See More Videos then Click on This Link :-www.youtube.com/@krishmobiletraininginstitute.
- If there is no any damage for the test points then we have to take a further step.
- The test point was not done any damage , so we can take it a further step.
- There is a resister near the test point. The resister seems to be corrupted.
Krish Mobile Training Institute
Now let us know about that resister :
- We have already done the flashing but the flashing itself is not running.
- Tried many flash tools.
- If we check why it is not running, there is another problem, we have found it out.
- The other technician messed up that resister before the flashing was run and that’s why this problem occurred.
- Now let’s open Borneo and find out the resister value in the smart board.
- That register goes to CPU on one side and EMMC on the other side.
- What happened to that damaged resister means that the value of the register became high. The value became more than the existing value.
- What happens when the resister value becomes high, the proper functioning of the resister is stopped.
- That’s why the mobile went into a dead condition which is an over all problem.
- This register has no value in bitmap or schematic.


Now let us solve problem in this mobile :
- Check the gr value of this resister.
- cpu side got 605 EMMC side and 494 gr value.
- Tracks towards cpu and not towards EMMC have not been cut.
- That resister value shows 80 kilo ohms in Multimetry. It also shows 95, 96 kilo ohms.
- If checked in reverse, it shows 68, 70, 80 kilo ohms.

- Correct value is not shown.
- We have another Vivo Y19 scrap board. Let’s check the resister value in it.
- On checking, the value was only 27 ohms.
- If we check on the board we have, we got 70, 80, 90, 95 kilo ohms.
- That is, the value is higher than the value it should be.
- The value was 27 ohms which was checked.

- The reason for the high value is that another technician put a jumper on that register with a soldering iron. That is why the high value came.
- High heat is applied to the register. When the heat is applied, the value automatically increases.
Now let's remove and replace the resister :
- Now we have to remove the resister from the board.
- Remove that resister with soldering iron.
- What we have to remove is a resister, so we have to remove it with a soldering iron.
- If we use a blower, there is a possibility that the cpu will get heat. Then the cpu will spoil.
- So that’s why Blower didn’t do it.
- We have to remove the resister with the same value from another scrap board and replicate it in our board.
- Vivo Y19 should be replaced on the board. Both sides of the resister should be soldered Vivo Y19 Dead While.
- After replacing, check the gr value on both sides.
- If we check the gr value of both sides, we get 483 on one side and 505 on the other side.
- The resister value is also 27 ohms.
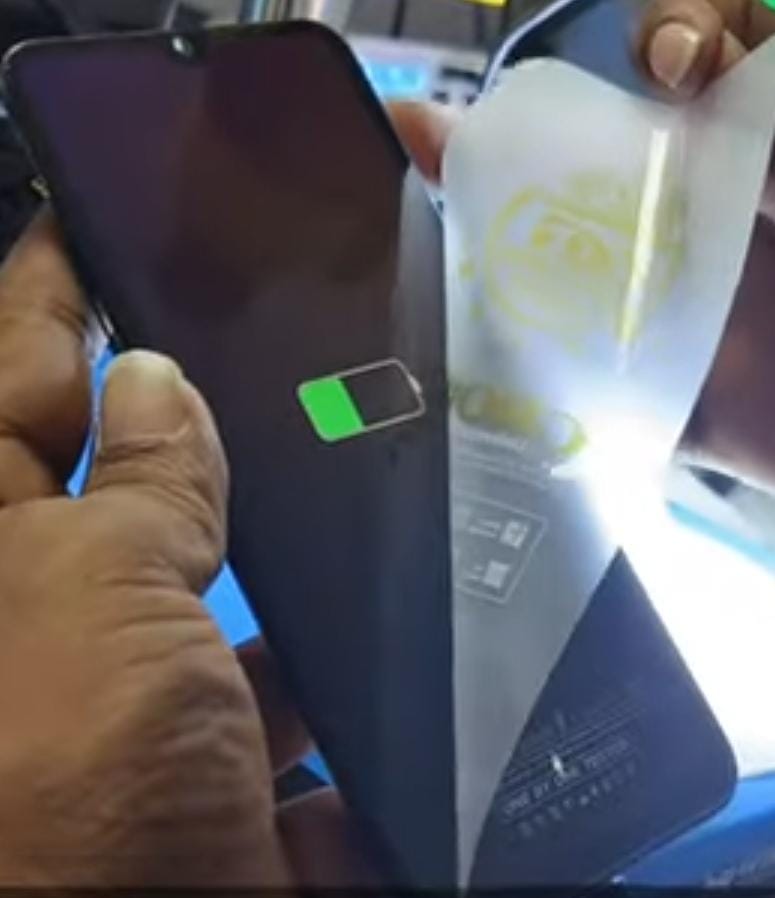
- So let’s connect the board to your mobile and check if the mobile turns on.
- Let’s check if the charger is connected and turns on.
- Mobile turned on successfully.
- The customer is happy.
VIDEO LINK IS GIVEN IN THE BELOW :
thank you by team k.m.t.
VIVO Y 19 DEAD WHILE DOING UNLOCK PROBLEM SOLVED BY TEAM K.M.T.
అందరికి నమస్కారం ,
ఇది Vivo Y 19 మొబైల్. కస్టమర్ ఈ మొబైల్ని మా షాప్కి తీసుకొచ్చాడు. టెక్నీషియన్ సమస్య ఏమిటని అడిగాడు. మరో టెక్నీషియన్ అన్లాక్ చేస్తుండగా మొబైల్ డెడ్ అయిందని కస్టమర్ చెప్పాడు.టెక్నీషియన్ మొబైల్ చెక్ చేసి రిపేర్ చేస్తానని టెక్నీషియన్ కస్టమర్తో చెప్పాడు.

ఇప్పుడు ఈ మొబైల్ని చెక్ చేద్దాము :
- ముందుగా మొబైల్ బ్యాక్ ప్యానెల్ ఓపెన్ చేయండి.
- ఈ మొబైల్ ఇప్పటికే మరో టెక్నీషియన్ వద్దకు వెళ్లింది. టెక్నీషియన్ అన్లాక్ చేయడానికి టెస్ట్ పాయింట్లను స్క్రాచ్ చేస్తుండగా, ఈ మొబైల్ డెడ్ అయ్యింది .
- అందుకే యూవీ మాస్క్తో కవర్ చేశాడు. తర్వాత అది మా దగ్గరకు వచ్చింది.
- ముందుగా మనం 6 ఇన్ 1 ఛార్జర్ని కనెక్ట్ చేస్తే 0.09 మిల్లియంపియర్ తీసుకుంటుంది .
- కంప్యూటర్కు కనెక్ట్ చేయబడితే, అది mtk పోర్ట్ను తీసుకుంటుంది.
- మరో టెక్నీషియన్ వేసిన uv మాస్క్ను శుభ్రం చేయాలి.
- టెస్ట్ పాయింట్ ఏమైనా దెబ్బ తిన్నాయా లేదా ప్రింట్ లేచిపోయిందా అని చెక్ చేయండి.
- ఇక్కడ టెస్ట్ పాయింట్ cpu మరియు EMMC మధ్యలో ఉంటుంది.
- ఆ టెస్ట్ పాయింట్ బ్లాక్ పేస్ట్తో కప్పబడి ఉంటుంది. ఆ బ్లాక్ పేస్ట్ ను మనం శుభ్రం చేసుకోవాలి.
- టెస్ట్ పాయింట్లకు ఎటువంటి నష్టం జరగకపోతే, మనము తదుపరి చర్య తీసుకోవాలి.
- టెస్ట్ పాయింట్కు ఎటువంటి నష్టం జరగలేదు, కాబట్టి మేము దానిని మరింత ముందుకు తీసుకెళ్లవచ్చు.
- టెస్ట్ పాయింట్ దగ్గర రెసిస్టర్ ఉంది. రెసిస్టర్ పాడైపోయినట్లుంది.

ఇప్పుడు ఆ రెసిస్టర్ గురించి తెలుసుకుందాం:
- మేము ఇప్పటికే ఫ్లాషింగ్ చేసాము, కానీ ఫ్లాషింగ్ రన్ చేయడం లేదు.
- అనేక ఫ్లాష్ టూల్స్ ప్రయత్నించారు.
- అది ఎందుకు రన్ అవ్వడం లేదు అని చెక్ చేస్తే, మరో సమస్య ఉంది, మేము దానిని కనుగొన్నాము.
- ఫ్లాషింగ్ అమలు కాకముందే ఇతర technician ఆ రెసిస్టర్ను పాడు చేశాడు మరియు అందుకే ఈ సమస్య ఏర్పడింది.
- ఇప్పుడు బోర్నియోను తెరిచి, స్మార్ట్ బోర్డ్లోని రెసిస్టర్ విలువను తెలుసుకుందాం.
- ఆ రిజిస్టర్ ఒక వైపు CPU మరియు మరొక వైపు EMMCకి వెళుతుంది.
- ఆ డ్యామేజ్ అయిన రెసిస్టర్కి ఏమైంది అంటే రిజిస్టర్ విలువ ఎక్కువైంది. ఉన్న విలువ కంటే ఎక్కువ అయింది.
- రెసిస్టర్ విలువ ఎక్కువగా ఉన్నప్పుడు ఏమి జరుగుతుంది, రెసిస్టర్ యొక్క సరైన పనితీరు నిలిపివేయబడుతుంది.
- అందుకే మొబైల్ డెడ్ కండిషన్లోకి వెళ్లింది, ఇది ఓవర్ ఆల్ సమస్య.
- ఈ రిజిస్టర్కి బిట్మ్యాప్ లేదా స్కీమాటిక్లో విలువ లేదు.

ఇప్పుడు ఈ మొబైల్లో సమస్యను పరిష్కరిద్దాం:
- ఈ రెసిస్టర్ యొక్క gr విలువను చెక్ చేయండి.
- cpu వైపు 605 EMMC వైపు మరియు 494 gr విలువ వచ్చింది.
- EMMC వైపు కాని cpu వైపు కానీ ట్రాక్లు కత్తిరించబడలేదు.
- ఆ రెసిస్టర్ విలువ మల్టీమెట్రీలో 80 కిలో ohms చూపుతుంది. ఇది 95, 96 కిలో ohms లను కూడా చూపుతుంది.
- రివర్స్లో చెక్ చేస్తే, అది 68, 70, 80 కిలో ohms లను చూపుతుంది.

- సరైన విలువ చూపబడలేదు.
- మాకు మరో Vivo Y19 స్క్రాప్ బోర్డ్ ఉంది. అందులోని రెసిస్టర్ వాల్యూని చెక్ చేద్దాం.
- చెక్ చేసినప్పుడు, విలువ 27 ohms లు మాత్రమే.
- మేము కలిగి ఉన్న బోర్డులో చెక్ చేస్తే, మనకు 70, 80, 90, 95 కిలో ohms వచ్చాయి.
- అంటే విలువ ఉండాల్సిన విలువ కంటే ఎక్కువ.
- వాల్యూ 27 ohms అనేది ఏ వైపు చెక్ చేసిన 27 ohms మాత్రమే రావాలి.
- అలాగే ఎటు చెక్ చేసిన 27 ohms మాత్రమే వచ్చిందీ.
- ఇది కరెక్ట్ అయిన వాల్యూ ఆ రెసిస్టర్ కి .

- హై వాల్యూ కు కారణం ఏమిటంటే, మరొక technician ఆ రిజిస్టర్లో soldering iron తో జంపర్ను ఉంచాడు. అందుకే హై వాల్యూ వచ్చింది.
- రిజిస్టర్కు అధిక హీట్ తగిలింది .హీట్ ని అప్లై చేసినప్పుడు , ఆటోమేటిక్ గా వాల్యూ పెరుగుతుంది.
ఇప్పుడు రెసిస్టర్ని తీసివేసి రిప్లేస్ చేద్దాం:
- ఇప్పుడు మనం బోర్డు నుండి రెసిస్టర్ను తీసివేయాలి.
- soldering iron తో ఆ రెసిస్టర్ని తొలగించండి.
- మనం తీసివేయవలసినది ఒక రెసిస్టర్ కాబట్టి, మనం దానిని టంకం ఇనుముతో తీసివేయాలి.
- మనం బ్లోవర్ని ఉపయోగిస్తే, cpuకి వేడి వచ్చే అవకాశం ఉంది. అప్పుడు cpu పాడైపోతుంది.
- అందుకే బ్లోవర్ use చేయలేదు.
- మన దగ్గర మరొక స్క్రాప్ బోర్డ్ నుండి అదే విలువ కలిగిన రెసిస్టర్ను తీసివేసి, దానిని మన బోర్డులో రిప్లేస్ చేయాలి.
- Vivo Y19ని బోర్డులో రిప్లేస్ చేయాలి. రెసిస్టర్ యొక్క రెండు వైపులా soldering వేయాలి.
- రిప్లేస్ చేసిన తర్వాత, రెండు వైపులా gr విలువను చెక్ చేయండి.
- మేము రెండు వైపుల gr విలువను చెక్ చేస్తే, మనకు ఒక వైపు 483 మరియు మరొక వైపు 505 వస్తుంది.
- రెసిస్టర్ విలువ కూడా 27 ohms .
- కాబట్టి మీ మొబైల్కి బోర్డ్ను కనెక్ట్ చేసి, మొబైల్ ఆన్ చేయబడిందో లేదో చెక్ చేద్దాం.
- ఛార్జర్ కనెక్ట్ చేయబడి, ఆన్ చేయబడిందో లేదో చెక్ చేద్దాం.
- మొబైల్ విజయవంతంగా ఆన్ చేయబడింది.
- కస్టమర్ సంతోషంగా ఉన్నాడు.

వీడియో లింక్ క్రింద ఇవ్వబడింది :
ధన్యవాదములు by team k.m.t.