
All Vivo Devices Andriod 12 / Andriod 13 FRP Bypass / Vivo Y27 FRP UnLock ( Without PC )…….. This Problem is Solved By Team KMT in English……
Welcome to Krish Mobile Training Institute.This is My Vivo Andriod SmartPhone Unfortunately i forgot My Phone Password i forgot my Phone Lock Screen Password which is why i can’t use this Phone.If you have forgotten the Password of your http://All Vivo Devices Andriod 12 Phone then my BLOG.Today on .Use it to Unlock the Phone.So,let’s Start the BLOG on How to Unlock the Phone by Hard Reset.If you forgot the Password Now,i will Show you How to Unlock this Model Smartphone.
DISCLAIMER :-

This is Tutorial BLOG for Educational Purpose only,try this Method only to Unlock your own Phone.Don’t try this Method on Stolen Phones.This is Serious Crime,if you are trying to unlock a stolen Phone you may also be Jailed.
Step 1:-
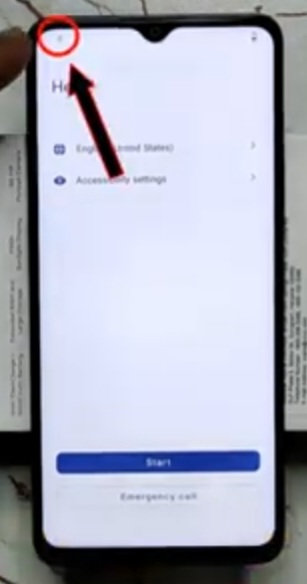
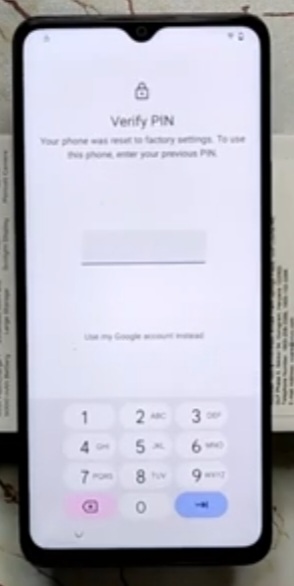
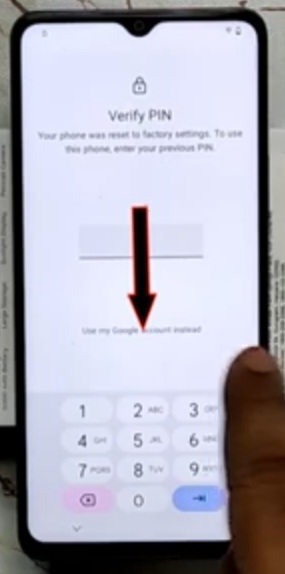
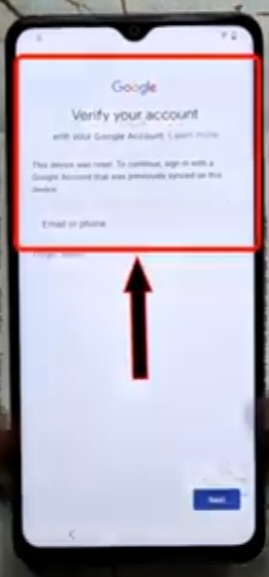
Hello! – Click on Start – Click on Next – Again Click on Next – Connect to Wi-fi – Click on Connect – Getting Your Phone Ready – Click on Don’t Copy – Checking Info – Click on Use My Google Account Instead – Checking Info – Google Verify Your Account –
Enter PIN – Takeout the SIM Card – Click on 3 Dot Icon – Click on Share – Click on Notes – Click on Agree – Click on (+) Symbol – Tittle ( Type here www.Youtube.Com ).
Step 2:-
Give a Small Click – www.Youtube.com – Click on Open – Click on Profile ID – Click on Settings – Click on About – Click on Youtube Terms of Services – Welcome to Chrome – Click on Use Account Instead – Click on No,thanks – Click on Address Box & Type VNROM – Click on Bypass Google Account 2023 – Click on Open Settings – Click on About Phone – Click on Software Information – Click on Settings – Click on Security & Emergency – Click on < – Click on System – Click on easy Share – Click on Agree.
Step 3:-
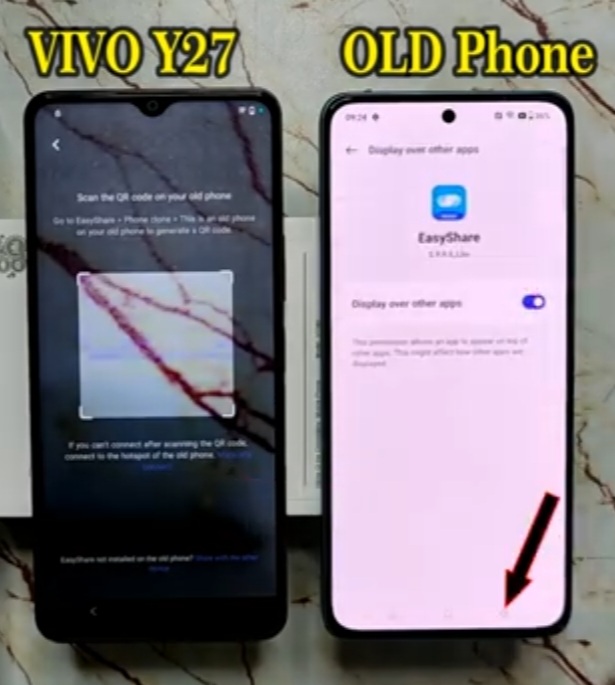
Add any G-mail Account in this Device – Now Open 2.D – Click on Play Store & Install Easy Share & Activity Launcher – Now Open Easy Share App – Click on Agree – Click on Phone Clone – 1.D _ This is a New Device – Click on Andriod – Click on Set Now – Click on Enable on – Click on < – Click on Andriod – Click on Got it – Click on While Using this App – Again Click on While Using this App – Click on Allow – Scan the QR Code on Your Old Phone – Click on This is an Old Device – Click on Set Now – Click on < – Allow to Modify the Settings – Click on < – Click on Phone Clone – Click on Set Now.
Step 4:-
Click on Easy Share – Click on Enable the Displaying Over Other Apps – Click on < -Again Click on < – Again Click on < – This is an Old Device – Click on Got it – Click on While Using this App – Click on Allow – This is an Old Device ( Connecting by Scaning QR Code – Now Scan QR – 2.D _ Connected Accessibility – Now UnCheck All Options – Click on Deselect All – Click on Apps – Click on Activity Launcher – Click on Ok – Click on Start Cloning – 1.D _ Click on Clock Icon – Click on Apps – Click on Open – Click on Ok – Loading – Click on Andriod SetUp – Click on Com Google Instead – Click on Set.
Step 5:-
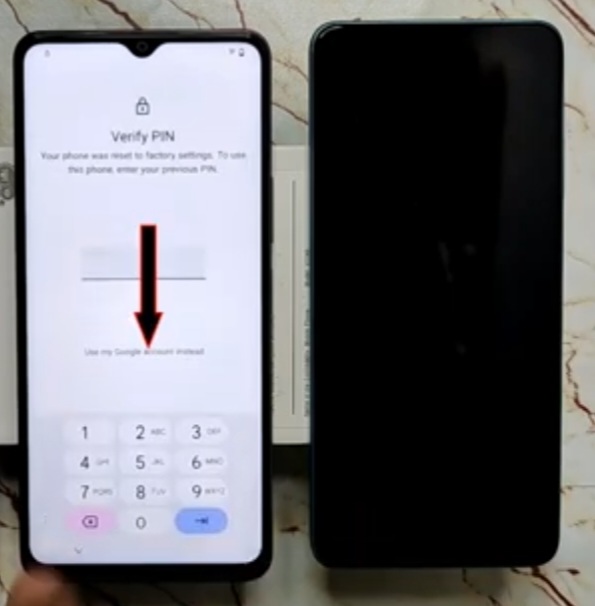
Click on Skip – Getting Your Phone Ready – Click on Copy – Click on Next – Click on No,Cable – Click on Without Cable – Click on Next – Checking Info – Checking Info – Verify PIN – Click on Use my Google Account Instead – Click on Next – 2.D _ Swipe Up – Click on Settings – Click on Google – Click on SetUp & Restore – Click on SetUp & Restore Settings – Click on Getting Started – Click on Next – Searching for Devices – 1.D _ Click on Next – V2249(162) – 2.D _ Connecting – click on Next.
Step 6:-
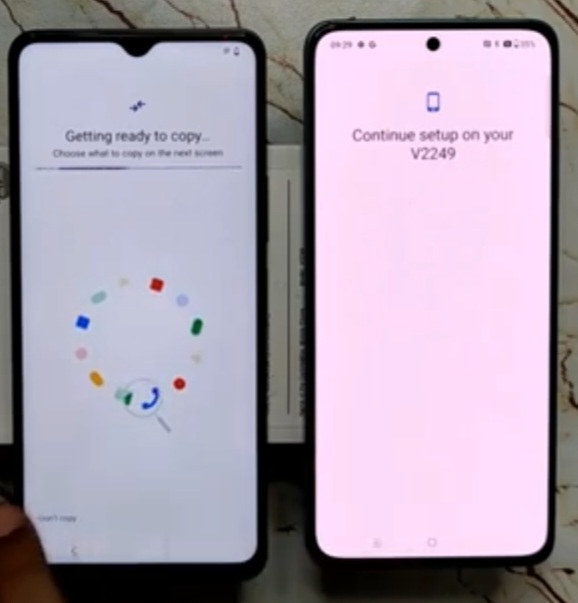
Copying Your Account – Continue SetUp on Your New Device – 1.D _ Enter Your Password – Click on Send – Copying Your Account – Connecting to Your Old Device – 2.D _ Continue SetUp on Your V2249 _ Getting Ready to Copy – Now Check only Device – Click on Setting – Click on Copy – Disable Call History – Copying Your Data – Getting Account Info – Click on Accept – Click on Skip – Click on Skip – SetUp Screen Lock – Checking – Click on Next – Click on More – Click on Skip – Again Click on Skip – Anything Else – Click on No,thanks – Copying Your Data – Stop Copying – Stop Copying – Click on More.
Step 7:-
Getting Your Phone Ready – ( Wait a few Moments ) – Hello! _ Click on Start – Click on Next – Again Click on Next – Getting Your Phone Ready – App Permissions & Service Recommendations – Click on Next – Click on Start – Click on Get Started – Swipe Up – Click on Settings – Click on Accounts – Now Remove G-mail Account and Reset the Devices – Account Removed – Click on < – Click on System – Click on Reset Options – Click on Reset All Options – Click on Reset All Settings – Again Click on Reset All Settings – Restoring – Vivo Logo is Displayed – Your SetUp is Ready to Loading……..
FOR MORE INFORMATION :-
Stay tuned by Subscribing to our KMT Youtube Channel for Tutorial Apps and Tricks to Unlock More new SmartPhones like this,http://www.youtube.com/@krishmobiletraininginstitute.